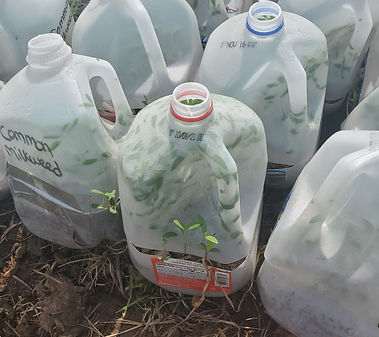
Winter Sowing in Milk Jugs


Instructions
Winter Sowing in Milk jugs: The Best Way to Start Native Seeds
Winter sowing in milk jugs is one of the most effective and easy ways to start native seeds for your garden. This low-maintenance, inexpensive method doesn’t require much effort, making it ideal for beginners and experienced gardeners alike. Using milk jugs to create mini-greenhouses is a simple yet effective technique to successfully start native plants and give them a strong start for the growing season.
Step-by-Step Guide to Winter Sowing in Milk Jugs
Follow this step-by-step guide to get started with winter sowing and create a thriving native garden with minimal work.
Step 1: Gather Your Materials
-
Clean and empty milk jugs (preferably half-gallon or gallon size)
-
Potting soil (seed-starting mix works best, but any soil or topsoil can be used)
-
Native seeds (choose species suited to your region)
-
Water (to moisten the soil)
-
Tape (duct tape or packing tape)
-
Markers (to label your jugs)
-
Scissors or utility knife
Step 2: Prepare the Milk Jugs
-
Clean the jugs thoroughly to remove any residues.
-
Cut the jugs vertically, leaving one side attached to act as a lid. Cut about 3-4 inches from the bottom for proper soil depth.
Step 3: Create Drainage Holes
-
Drill small drainage holes at the bottom of the jug for excess water to escape, preventing mold or rot.
Step 4: Fill with Soil
-
Add potting soil into each jug, leaving an inch of space from the top.
-
Moisten the soil lightly so it's damp but not soggy.
Step 5: Plant the Seeds
-
Sow seeds at the appropriate depth, following the instructions on your seed packet. Generally, plant seeds about 2-3 times their size deep.
-
Label each jug with the seed variety and planting date.
Step 6: Close the Jugs
-
Seal the jugs with tape to create a mini-greenhouse effect, trapping warmth and moisture.
Step 7: Choose a Location
-
Place the jugs outside in a sunny spot that gets at least 6 hours of sunlight per day. The milk jugs will serve as mini-greenhouses, providing the ideal conditions for your native plants to germinate.
Step 8: Monitor and Maintain
-
Check moisture levels regularly. If the soil feels dry, open the jug slightly and add water.
-
On warmer days, ventilate the jugs by slightly opening them to prevent overheating and mold growth.
Step 9: Watch for Germination
-
Germination time will vary depending on the type of seeds. It could take a few weeks to a couple of months, so be patient and watch for new growth.
Step 10: Transplant (if necessary)
-
Once seedlings are strong enough (with a few true leaves and appropriate weather conditions), transplant them into your native garden or larger pots. Native plants are hardy and typically require minimal hardening off.
Tips for Successful Winter Sowing
-
Timing: You can start winter sowing as early as mid-winter. In zone 6b, I begin in December, January, or February.
-
Native plants are resilient and thrive with minimal attention. Even if you occasionally forget to water, native plants are forgiving and often grow better with less intervention. They are ideal for gardeners looking for a low-maintenance yet sustainable garden.
Why Winter Sowing Works
Winter sowing is an excellent method for starting native seeds because it mimics the natural conditions of the outdoors, allowing seeds to experience the natural freeze-and-thaw cycle. This helps improve germination rates and ensures a more successful garden in the spring.
Enjoy Your Gardening Adventure!
With winter sowing, you can easily grow a beautiful native garden with minimal effort. Watch your native plants thrive as they adapt to the environment and provide food and shelter for local wildlife and pollinators.